Are you ready to sew a Mally the Maker rag doll? This cute cloth doll is perfect for cuddling at 17 inches tall and includes many skill-building sewing techniques. This sewing tutorial will guide you through the process of making your own rag doll and a charming set of doll clothes.
Click Here to find the pattern for the Mally rag doll. The Mally doll pattern includes pattern pieces to sew the rag doll, t-shirt, and pants (trousers or jeans). This is an intermediate sewing project because the doll pants design includes real working pockets and a front fly.
Don't worry - each step of the process has detailed instructions. This sewing tutorial also includes 3 helpful videos to guide you every step of the way!
Rag Doll Sewing Tutorial Contents
Sewing Rag Dolls and Doll Clothing
First, let's how to make a rag doll and gather the things we need before we start making dolls.
What is a Rag Doll?
A rag doll is a simple, handmade doll made from scraps of fabric and stuffed with soft fiberfill. Traditionally, rag dolls are made from calico fabric. The Mally the Maker and Ms. Bunny cloth dolls are both designed to be sewn from woven 100% cotton fabric, commonly called quilters cotton.
Affiliate Note - Links to Amazon.com have been included in this tutorial. I've linked sewing tools and supplies that I use and recommend that can make this project easier. These links to earn a small commission for us at no cost to you.
Materials You'll Need
To make a Mally rag doll toy and doll clothes, you'll need the following materials:
- ½-yard Fabric A - Skin tone color for body
- Fat quarter (18 x 21 inches) Fabric B - Red fabric for shirt
- Fat quarter (18 x 21 inches) Fabric C - Blue fabric for pants
- Freezer Paper
- Sew on snap for pants
- Brown or black embroidery floss
- Black embroidery floss OR two doll safety eyes
- Acrylic yarn
- Cotton piecing thread to match fabric colors
- Polyester Fiberfill
- Chopstick for filling the doll
- Hand sewing needles
- Embroidery needle
- Fabric marking pen or pencil
- Basic sewing supplies including including a ¼-inch patchwork foot and zigzag foot
Crafting Your Mally Rag Doll
Both the Mally cloth doll and Ms. Bunny rabbit doll patterns have the same body shape. This means the dolls clothes included with each pattern can fit both dolls!
Make sure to watch the video tutorial on sewing the Ms. Bunny doll for extra tips on sewing and stuffing the arms and legs.
Video 1 - How to Sew the Mally Rag Doll
Watch this sewing YouTube video to see how to sew a rag doll step-by-step:
Here's a few extra tips on the steps to sew Mally the Maker successfully:
How to Add Doll Facial Features
I embroidered the face on my rag doll using a needle and thread and stitching a basic running stitch. Use embroidery thread to stitch a nose and a mouth to the front face piece. Be creative and give your doll a unique expression.
Safety eyes are a great choice for rag dolls being given to babies and toddlers. The plastic backs pop in place securely and are very difficult to remove. Click Here to find a multi-size pack of safety eyes for your handmade dolls.
Another option for doll facial features is to draw the design on the doll face with fabric markers or pens. Practice on paper first to ensure you'll get the colors and appearance you like before coloring your fabric.
Click Here to find Micron Pigma Pens - these are great for thin lines and fine details. Heat set the marks with a hot, dry iron to make them permanent.
Click Here to find Fabrico Markers - Fabric markers are the best choice for coloring in details like eyes, mouth, and to color rosy cheeks. I've used Fabrico markers for years and found the marks to be very colorful and color fast.
Sewing the Doll Body
I included lots of tips within the Mally fabric doll pattern on how to prepare and sew this diy doll. Make sure to mark all the dots and notches as they really help to align pieces when needed.
Click here to watch the video on sewing the Ms. Bunny Doll. That video includes extra sections for you to see how to sew and partially stuff the legs and arms for your cloth doll.
The hardest seam to stitch in this rag doll sewing tutorial is the last one. Stitching around the rag doll body and securing the arms and legs at the same time is tricky. Pin, baste stitch, and sew slowly for best results!
Sewing Doll Clothes - Sew a T-Shirt
A fun doll outfit is included with every pattern we offer here. The clothing patterns included are based on the characters in the book Mally the Maker and the Queen in the Quilt. Both dolls are the same size and can wear each other's clothes.
If you have suggestions for more dolls clothes patterns, I'd love to know! Click Here to share your suggestions.
The Mally cloth doll includes pieces for a doll t-shirt and doll pants (doll trousers). This t-shirt pattern is designed to pull over Mally's head and includes three sleeve lengths: short, 3/4 length, and long sleeves.
Creating doll clothing can be both fun and challenging. It's a great way to use up fabric scraps and add personality to your rag doll.
Choosing Fabric for Dolls Clothes
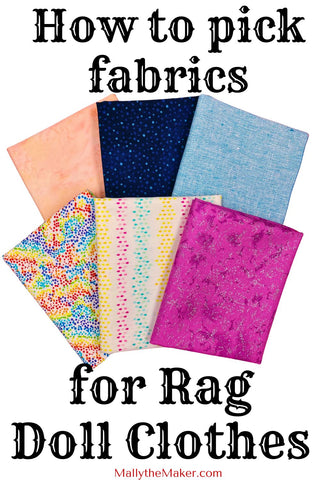
Selecting the right fabric is crucial for the look and feel of the doll's wardrobe. Lightweight woven cotton fabric is the best choice for this doll. Head to your local quilt shop and look for fat quarters. You only need 1 fat quarter of fabric to make this doll shirt for Mally, and sewing them can become quite addictive!

How to pick the right prints for dolls clothing - Look for small scale prints with 1/4 inch or smaller motifs. Take a look at the clothes in your closet in comparison with the size of your hand. A large scale print is around the size of your hand and makes quite a statement on a shirt or dress.
We can use this same guide for picking prints for doll clothes. If the printed shapes on the fabric is bigger than the doll's hand, it's probably too big for the t-shirt. Look for prints that are smaller in scale or solid fabrics in colors you like for the best results.
Video 2 - How to Sew a Doll Shirt
Watch this YouTube sewing video to see how to sew a rag doll t-shirt with me:
All of the raw edges of Mally's t-shirt are finished with a narrow strip of fabric. We cut the strip on the bias - or diagonal grain - for extra stretch through the neckline.
If you look at the t-shirt you have on right now, most likely it's construction very similarly. Most t-shirt hems and necklines are sewn to a fabric strip, then the serged seam allowances are pressed to the wrong side.
I hope this inspires you to try sewing your own t-shirts!
Sewing Clothes for Dolls - Pants, Jeans or Trousers
Are you ready to take your sewing skills to the next level? I designed Mally's pants to be just like real blue jeans with working pockets and a button fly.
As a kid, I always wanted things to be real - real pockets, real backpack that could unzip, real secret cabinet with a working lock. I found it really disappointing especially when pockets weren't functional and just stitched to look as if they were there.
This is an intermediate sewing pattern, but don't let that scare you. However, if you have sewn a few Mally rag dolls and Ms. Bunny rabbit dolls, you are ready for this challenge!
Video 3 - How to Sew a Doll Jeans or Trousers
Watch this sewing YouTube video and learn how to make doll clothes trousers / jeans / pants with me:
I really like using contrasting colored fabric for the front pockets so they stand out. If you're going to bother to make functional pockets, they might as well stand out!
If you would like a simpler version of this pants pattern, please send me a message and let me know. I'm planning a new pattern pack of doll clothes and would like feedback on the garments you'd like Mally and Ms. Bunny to wear.
Personalizing Your Rag Doll
Now it's time to make your Mally rag doll unique! What is her name and what sewing adventures has she just returned from? Here are some ideas to inspire you:
Accessories and Details
- Tuck small charms or tiny spools of thread into Mally's pockets.
- Bling up the back pants pockets with decorative stitches.
- Add buttons, sequins, or beads for extra detail.
- Use fabric markers or iron-on transfers to add designs to the clothing.
Rag Doll Costume Variations
- Make themed outfits, like a ragged doll costume for Halloween or festive attire for the holidays.
- Create a wardrobe that reflects different seasons or occasions. Keep an eye out for small scale prints for all seasons.
- Sew miniature versions of your own favorite outfits for the rag doll. You can make a mini-me!
Storing and Displaying Doll Clothes
Once you've made a collection of clothes for your Mally rag doll, you'll want to keep them organized and in good condition.
Doll Clothes Storage Ideas
- Wrap a small shoe box with paper and decorate to look like a doll's wardrobe or closet.
- Insert a dowel rod in the top and secure with screws to make a miniature wardrobe or clothes rack.
- Find perfectly sized doll clothes hangers right here!
Make More Makers - Gifting and Selling Mally Dolls
Congratulations! You've now learned how to make a Mally rag doll and a variety of doll clothes. Remember, the beauty of handmade toys lies in their imperfections and the love that goes into sewing them.
I hope you will make many Mally the Maker rag dolls and Ms. Bunny rabbit dolls to gift or sell. This pattern is sold with no restrictions - make and sell as many dolls as you like!
You never know when the gift of a homemade doll will inspire a child to pick up sewing or quilting later in life. I love knowing more Ms. Bunny and Mally dolls are being made to spread the love of sewing and quilting with more children.
Making these cloth dolls is a delightful way to express your creativity. With patience and practice, you'll find that each cloth doll you create is another character in your sewing adventure.
Let's go sew!
Leah Day


